
In this post, I’ll be diving into the different types of SAP system messages and their importance, especially in purchasing documents. We’ll explore how SAP classifies messages as Information, Warning, or Error, and I’ll guide you step-by-step on how you can change a Warning message to an Error message in a purchasing document. To make things clearer, I’ll also provide necessary screenshots and detailed explanations so that you can easily follow along.
This guide provides an overview of the common types of SAP system messages, their purposes, and how to address them effectively.
Types of System Messages
There are diferents types of system messages in SAP:
- Success Messages
- Information Messages
- Warning Messages
- Error Messages
- Abend Messages
Messages typically appear in two locations:
- Bottom left-hand corner of the screen – To get more details on these messages, double-click on them, and a help dialog box will appear.
- Pop-up dialog box – These require your immediate attention and action.
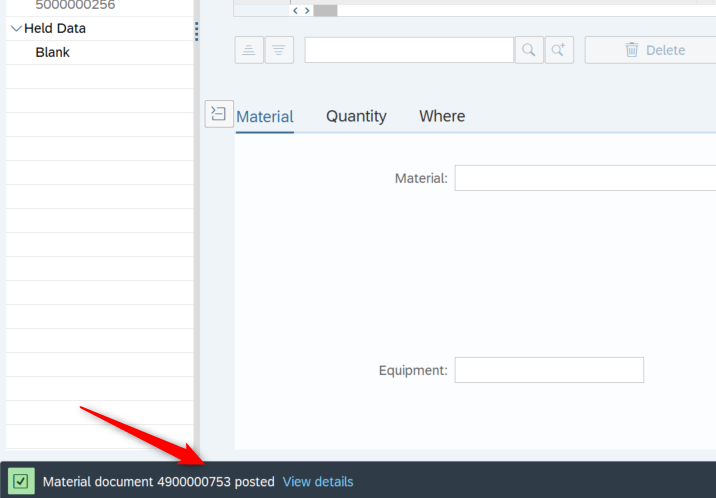
S (Success) Message
Information messages, which appear in green, indicate that SAP has successfully completed the requested action (e.g., saving or posting data). They do not require any further action from the user, allowing you to continue with your next task without interruption.
Example:
A document has been posted successfully.
You can proceed without clearing the message as it does not block further actions.
I (Information) Messages
Displayed in a modal dialog box. The user must acknowledge it to proceed by pressing “Enter.”
Example:
Information : Application not executable

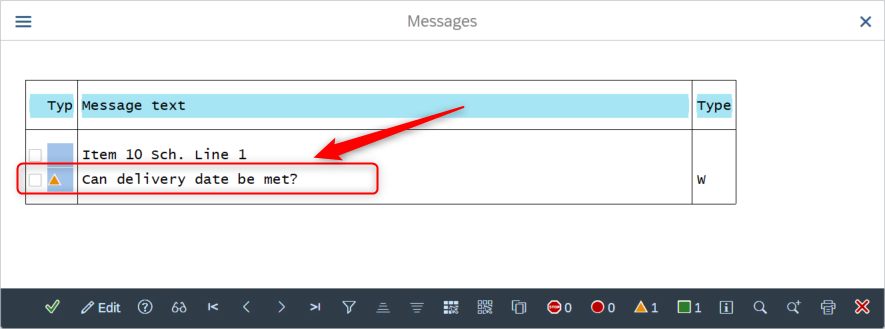
W (Warning) Message:
Interrupts processing and allows the user to correct inputs. It can appear in the status bar or as a dialog box, depending on where it is triggered. Similar to error messages but less critical, users can still make corrections before proceeding.
Example:
Warning: Data will be lost if you exit this transaction.
In case of warnings appearing in the bottom left corner, you can clear them by pressing “Enter.”
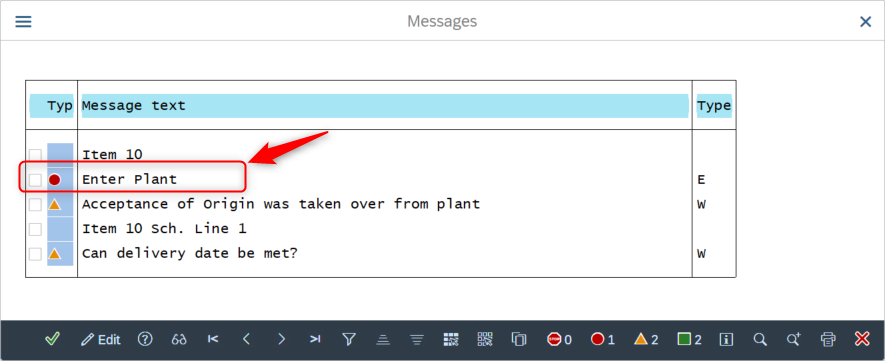
E (Error) Message:
Triggers when an error is detected. The user must correct the input before proceeding. This type can appear either in the status bar or in a separate dialog box, depending on the context.
Example:
Required field Plant has no entry.
In this case, the user must enter a valid Plant to proceed.
A (Abend) Message:
These critical messages stop further action. The user cannot make corrections and must acknowledge the message. Abend messages terminate the current task and return the system to a higher-level menu.
Example:
If we try to access the MB1B transaction in S/4HANA (this transaction is obsolete), we’ll encounter an ‘Abend Message.’

Icons in Messages
SAP uses icons to differentiate between message types:
- Information Message (I):

Provides useful information or confirmation. - Error Message (E):

Highlights a critical issue requiring immediate correction. - Warning Message (W):

Alerts the user to potential problems. - Abend Message (A):

Marks severe errors that end the current transaction.
Blocking a Past Delivery Date in a Purchase Order
In this tutorial, we will address how to handle the scenario where the system provides only a Warning message when a delivery date in the past is entered in a Purchase Order (PO). We’ll guide you through the steps to change this Warning message into a Blocking (Error) message, preventing users from creating POs with past delivery dates.
Step 1: Create a Purchase Order with a Past Delivery Date
To begin, let’s create a Purchase Order (PO) with a delivery date set in the past:
- Navigate to the Create Purchase Order transaction (T-code: ME21N).
- Enter the necessary details for the purchase order.
- Purchasing Organization: C0E4
- Purchasing Group: S90
- Company Code: MSBS
- Supplier: 900655
- Material: BOLT1001
- Condition PB00 (Price): 100 EUR per piece
- In the Delivery Date field, select a date that is in the past.Example: If today’s date is October 23, 2024, set the delivery date to October 16, 2024.
Step 2: Display the Warning Message
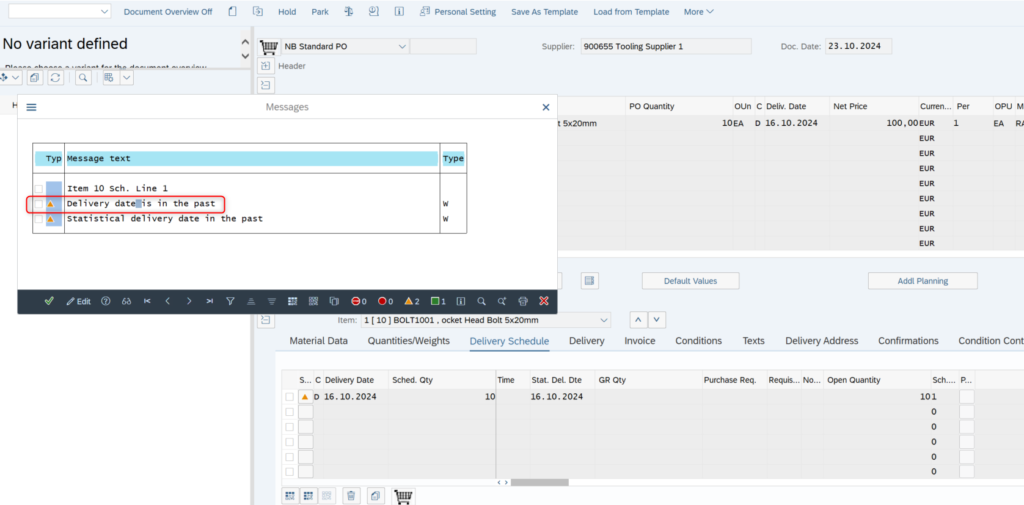
Once you input the past delivery date and attempt to save the PO, the system will trigger a Warning message:
Message example:
“Delivery date is in the past”
This warning appears to inform the user but does not stop the process—you can still generate the PO by pressing “Enter” or confirming the warning. However, what if you want to block users from creating POs with delivery dates in the past?
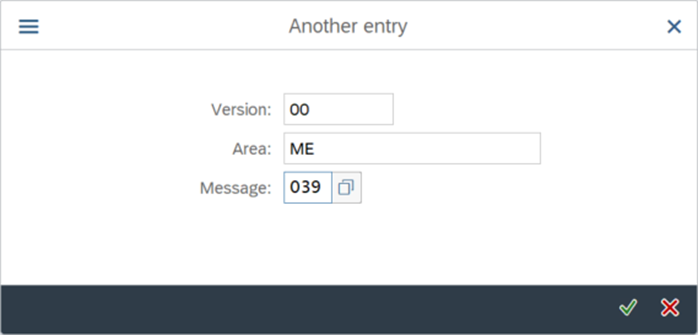
Before we proceed with changing the message type, let’s first identify the message number associated with the warning.
- After the warning message appears, select the line containing the warning.
- Double-click on the Warning type (W) icon or message.
- Next, click on the Technical Information button.

This will display detailed information about the message, including the message number. In our example, the message number for the delivery date warning is ME 039.

Now that we have the message number, we can use it to switch the message type from Warning (W) to Error (E).
Step 3: Changing the Warning Message to an Error Message
To prevent users from creating Purchase Orders with past delivery dates, you can change the system’s response from a Warning (W) to an Error (E). This will block the user from saving the PO until a valid delivery date is entered.
Here’s how to do it:
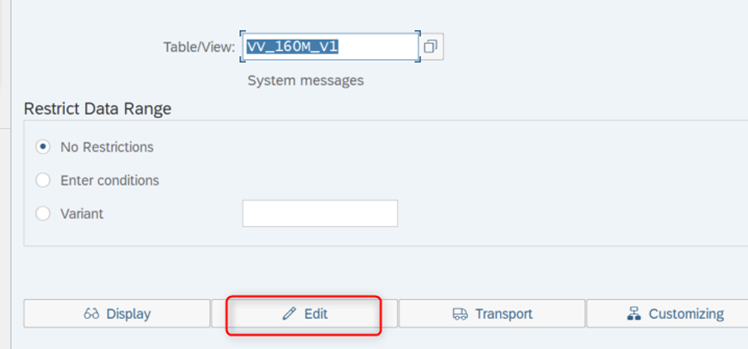
- Go to transaction SM30 to maintain table entries.
- Enter the table name VV_160M_V1 and click on Edit.(Insert screenshot showing SM30 entry with the VV_160M_V1 table name)
Alternatively, you can access this through the following menu path:
SAP Customizing Implementation Guide → Materials Management → Purchasing → Environment Data → Define Attributes of System Messages
Then select System Message.

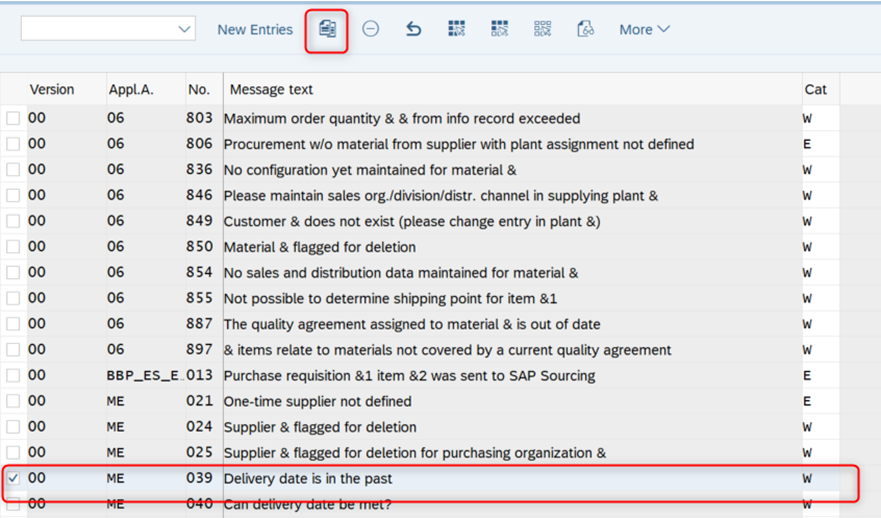
- In the list of messages, search for the specific message related to past delivery dates by clicking on Position and entering the relevant information (message number, description, etc.).
- Once you’ve located the message, you can either change the message type from W (Warning) to E (Error) if you want this configuration to apply to all users system-wide. However, if you only want this restriction to apply to certain users, you’ll need to create a new version of the message and assign it to specific users afterward.
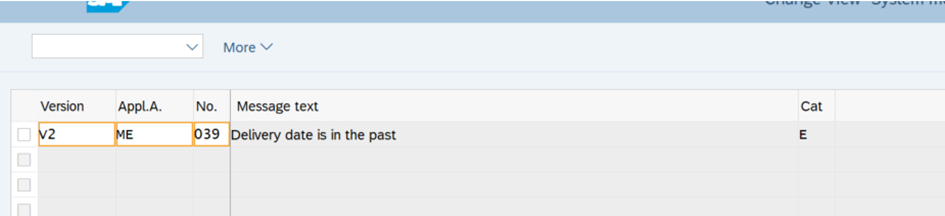
- Select the line and click Copy to generate a new version.For the new version, set the category to E (Error Message) and give it a new version name, such as V2.
- Save your changes.
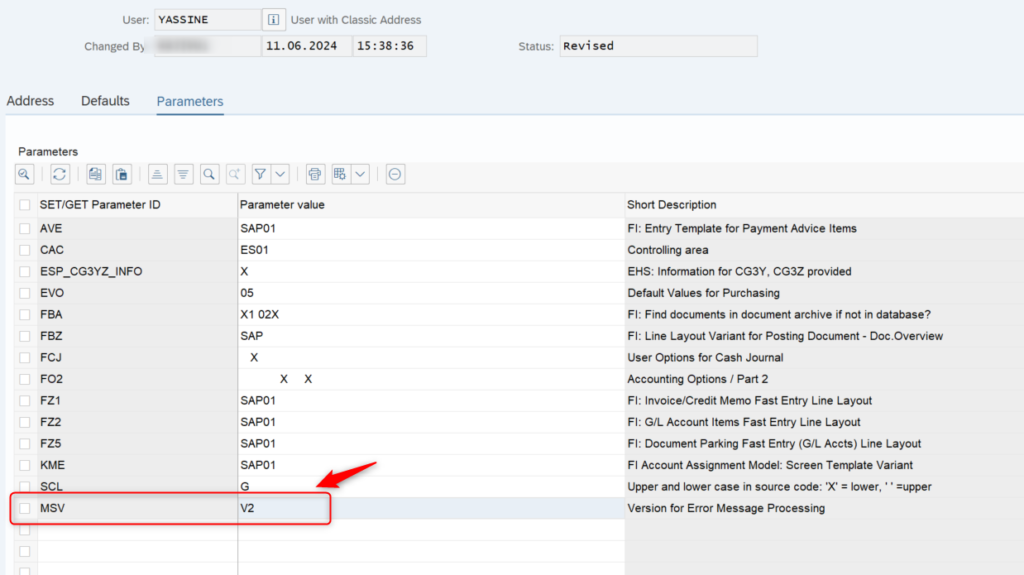
Step 4: Assigning the New Version to Specific Users
After creating the new version of the message (e.g., V2 with Error), you’ll need to assign it to the relevant users. To do this:
Step 5: Test the Change
Now, go back to the Create Purchase Order (ME21N) screen and enter a delivery date in the past, just like you did earlier. This time, when you attempt to save the PO, the system will block the process by displaying an Error message instead of a Warning.
Error Message Example:
“Delivery date is in the past – entry not allowed”
This prevents the user from proceeding until they input a valid future delivery date.
